Reviving a Dried Orchid with Just a Spoon: A Simple Guide to Regrowing Healthy Roots
Orchids are often seen as delicate and difficult plants, but many varieties are surprisingly resilient. Even when they appear dried out and lifeless, they can recover with the right care. One simple method—often shared among plant enthusiasts—involves minimal tools, patience, and a basic understanding of how orchids grow. This guide explains how to revive a dried orchid and encourage the growth of fresh, green roots using a simple, low-intervention approach.
Understanding the Condition of a Dried Orchid
Before starting, it’s important to assess the plant. A “dried orchid” typically has:
- Wrinkled or shriveled leaves
- Brittle or hollow roots
- A dry, lightweight potting medium
- Little to no visible growth
Despite this appearance, the orchid may still be alive if the crown (the central part where leaves grow) is firm and not rotting.
Why Root Recovery Matters
Healthy roots are essential for orchids because they absorb moisture and nutrients from the environment. Without viable roots, the plant cannot sustain itself. Encouraging new root growth is the key step in bringing a dried orchid back to life.
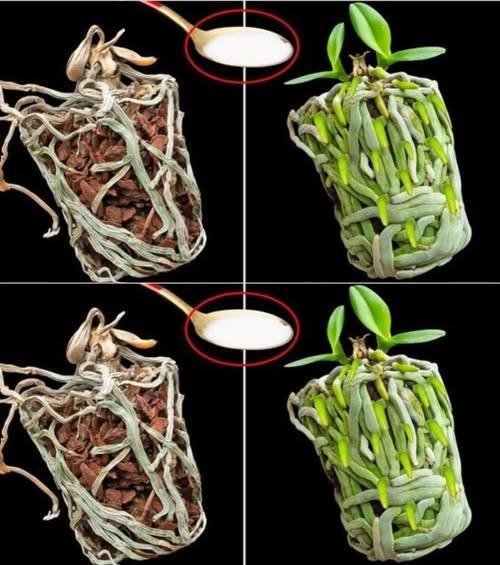
The “Spoon Method” Explained
The phrase “just a spoon” refers to a minimal watering and care technique rather than a literal reliance on a spoon as a tool. It emphasizes controlled hydration instead of soaking or overwatering.
Step-by-Step Process
1. Remove the Orchid from Its Pot
Gently take the orchid out and inspect the roots. Trim away any dead, mushy, or completely dry roots using clean scissors.
2. Clean the Root System
Rinse the remaining roots with room-temperature water to remove debris and old potting material.
3. Prepare a Fresh Potting Setup
Use a well-draining orchid mix such as bark chips or sphagnum moss. Orchids do not grow well in regular soil.
4. Controlled Watering Using a Spoon
Instead of soaking the plant, use a spoon to add small amounts of water directly to the base of the plant every few days. This prevents overwatering while maintaining slight moisture.
- Add 1–2 spoons of water every 2–3 days
- Focus on moistening the medium, not flooding it
5. Provide Indirect Light
Place the orchid in bright, indirect sunlight. Avoid direct sun, which can stress a weakened plant.
6. Maintain Humidity
Orchids benefit from moderate humidity. You can place a tray with water nearby or lightly mist the air around the plant.
Signs of Recovery
With consistent care, you should begin to notice:
- Small green root tips emerging
- Leaves becoming firmer
- Gradual return of vibrant color
This process can take several weeks, so patience is essential.
Common Mistakes to Avoid
- Overwatering: Too much water can cause root rot, especially when roots are already weak.
- Using regular soil: Orchids need airflow around their roots.
- Direct sunlight exposure: This can dehydrate the plant further.
- Frequent repotting: Let the plant stabilize before making further changes.
Long-Term Care Tips
Once the orchid begins to recover:
- Transition to a regular watering schedule (typically once a week)
- Fertilize lightly with orchid-specific nutrients
- Repot only when necessary (every 1–2 years)
Conclusion
Reviving a dried orchid doesn’t require complex tools or expensive treatments. With a careful approach—symbolized by the “spoon method”—you can gradually restore moisture, encourage new root growth, and bring your plant back to life. The key lies in restraint, observation, and consistency.